

 | Can be directly controlled with an on-off button, or operate in parallel connection to a lamp. |
 | The fan can be provided to continue to operate for a certain length of time after being switched off, by use of a time delay electronic card. |
 | Thermal protection with sensors against overheating in hot places. |
 | Special production for the ambience of the place with various color options. |
| Voltage/Frequency | (Volt/Hz) | 230/50 |
| Current | (A) | 0.13 |
| Power | (Watt) | 17 |
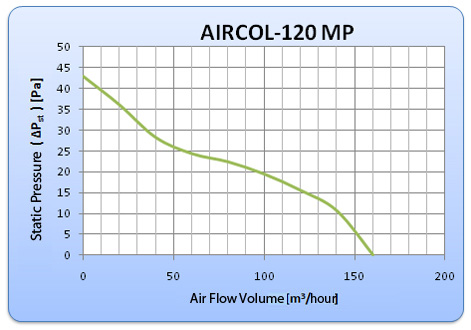
| Air Flow | (m³/hour) | 160 |
| Speed | (Rpm) | 2300 |
| Pressure | (Pa) | 43 |
| Sound Pressure Level (@3m) | (dB (A)) | 36 |
| Min. / Max. Ambient Temperature | (ºC) | -30 / 40 |
| Material | ABS plastic | |
| Protection Class / IP | II / IPX4 | |
| Motor Insulation Class | B | |
| Approval | TSE | |
| Certification | CE |
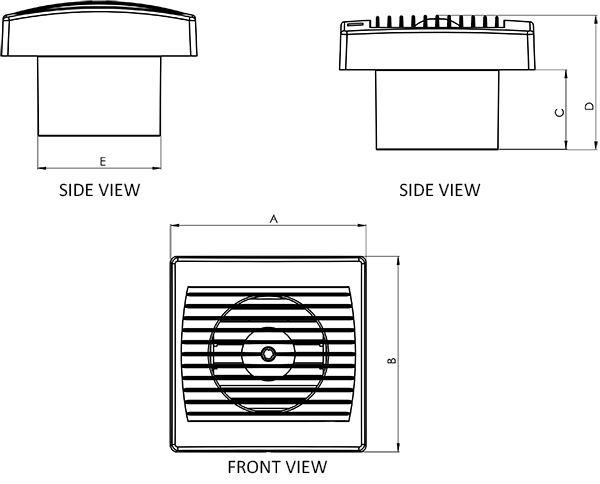
| MODEL | A | B | C | D | E |
|---|---|---|---|---|---|
| AIRCOL 120 MP | 186 | 186 | 76 | 119,5 | 120 |
 |  |
| Installation on ceiling | Installation on wall with an extension |
 |  |
| Installation on wall | Installation on single or double layer glazing |
 |
| Installtion on Glazing |
| » Create a hole of Ø124~ Ø129 mm on the glass. » Stick the four sound absorber sponges given with the product on four corners of the fan. » Lastly, install the fan on the glazing by use of the fastening bracket. |
 |
| Installation on Wall |
| » Remove front cover. » Create a hole of Ø124~ Ø129 mm on the wall. » Create four Ø6 mm dowel holes on the wall for four corners of the fan and place the dowels in the holes. » Stick the four sound absorber sponges given with the product on four corners of the fan in such a manner that the screw holes are not closed. » Install the fan on the wall as seen on the detailed diagram. |


